Setup to Control Linkbots Using Linkbot Labs and RoboBlocky
Note: FAQs with troubleshooting tips and info on updating firmware on a Linkbot are here. (If the firmware needs updating you will get a message to that effect when you try to connect the Linkbot through Linkbot Labs or RoboBlocky, as described below.)
Overview: To control physical Linkbots you need either to download and install Linkbot Labs software or the Linkbot IDE extension for Chromebooks. Section A below has instructions for Windows and MacOS machines, and Section B has instructions for Chromebooks. Non-Windows tablets are not currently supported for physical Linkbots.
A. Instructions for Windows and MacOS
(1) Download and install the latest version of Linkbot Labs. Download information and links are available on the RoboBlocky Download page.
(2) Launch RoboBlocky at www.roboblocky.com using a regular browser (Chrome is recommended).
(3) Connect the physical Linkbot to the computer using either a micro USB cable or a wireless dongle, and then add the Linkbot’s ID (found on the Linkbot’s label, e.g., “ZG81”) using the Linkbot Labs sidebar on the left side at RoboBlocky, as shown in Figure 2 below. (Click on the “Linkbot Labs” arrow just below the RoboBlocky heading at the top left to open or close the sidebar, as circled in red in Figure 1.) Note that when first opening RoboBlocky it may take a few seconds for the Linkbot Labs arrow to appear.
.png)
Figure 1: RoboBlocky user interface with the Linkbot Labs sidebar closed. Click on the “Linkbot Labs” arrow, as circled in red in the image, to open the sidebar (or close the sidebar, if open).
.png)
Figure 2: RoboBlocky user interface with the Linkbot Labs sidebar open. Enter the ID for a Linkbot in the box (circled in red) and click the “Add” button.
Wndows/MacOS Instructions, continued:
(4) Drag a Linkbot instruction block such as driveDistance() to the Workspace area of RoboBlocky.
(5) Click “Run” or “Step” to move the virtual Linkbot on the grid and the physical Linkbot at the same time.
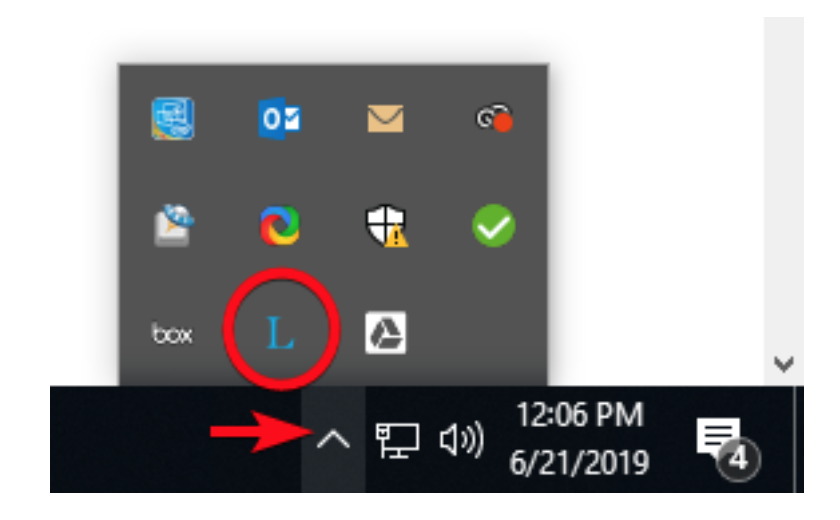
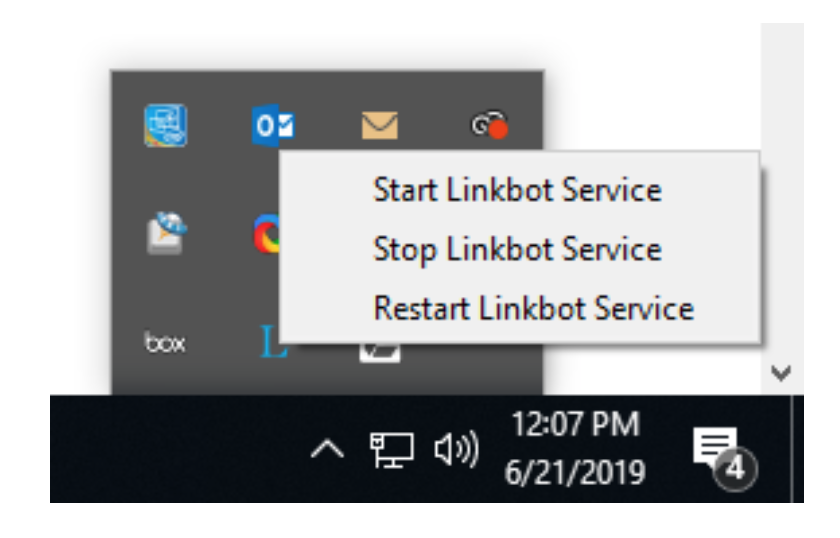
(6) If the physical Linkbot does not move, you may need to restart the Barobo Linkbot Service program by right-clicking on the “L” in the Windows task list at the bottom right of the screen (Figures 3 and 4 below) or clicking on the “L” in the Mac menu bar at the top of the screen (in the list of icons on the right side of the menu bar, Figure 5 below). Choose “Restart Linkbot Service” from the popup menu. (If the "L" is missing, restarting the computer should solve the problem, as the Linkbot Service is launched automatically when the computer starts. If you are using a Windows machine, an alternative to restarting is to double click the "LinkbotServiceManager.exe" program located at C:/Program Files (x86)/LinkbotLabs 2.1.x.)

Figure 3: Accessing the Linkbot Service “L” in the Windows task list.

Figure 4: The popup menu with Linkbot Service options (Windows interface).

Figure 5: The Linkbot Service “L” in the Mac menu bar (your list of icons will be different). A similar popup window as for Windows will appear when you click the L.
Windows/MacOS Instructions, continued:
(7) If you receive messages about firmware needing updating, see https://www.barobo.com/faq-troubleshooting for guidance.
